Firstly published on May 11, 2017. Updated on January 30, 2020
What’s extremely awesome about our Gantt Chart library (besides fast performance and vast variety of features) is that it allows integrations with almost all new and popular frameworks and technologies. And today we’ll show you the easiest way to use js gantt chart with Vue.js, progressive JavaScript framework.
So, follow the instructions below to create a Vue.js Gantt chart or jump to a complete demo on GitHub right away.
New to dhtmlxGantt? Learn more about the library now
How We Start
The first thing we need to do is to get an app skeleton. And for this, we’re going to use vue-cli. If you don’t have one, you can get it with the node package manager using command (npm install -g @vue/cli). See this article.
To create an app, run the following command:
It will request some project info. You can just leave default answers and press the enter button for each question or select functions manually.
Then you need to go to the app directory, install dependencies and run it.
If you use yarn, you need to call the following commands:
yarn serve
If you use npm, you need to call the following commands:
npm run dev
After these steps, the app should run on http://localhost:8080

Moving to Gantt Chart Part
Now we should get the dhtmlxGantt code. To do so, run the following command:
npm install dhtmlx-gantt --save (for npm)
Then, to add a Gantt chart to an application, we should create a component.
So, we’ll start by creating a folder for the app components. Open the src folder and create components folder in it. Then, create Gantt.vue file in the components folder and put the following code into it:
<template>
<div ref="gantt"></div>
</template>
<script>
import 'dhtmlx-gantt'
export default {
name: 'gantt',
props: {
tasks: {
type: Object,
default () {
return {data: [], links: []}
}
}
},
mounted: function () {
gantt.config.xml_date = "%Y-%m-%d";
gantt.init(this.$refs.gantt);
gantt.parse(this.$props.tasks);
}
}
</script>
<style>
@import "~dhtmlx-gantt/codebase/dhtmlxgantt.css";
</style>
Now, the Gantt chart component is ready. When the element will be added to the page it will initialize the Gantt chart under “gantt” ref. Then, Gantt chart will load data from the tasks property.
And now it’s time to add the component to our app.
Open App.vue and add the following code instead of the one we’ve already had there.
<template>
<div class="container">
<gantt class="left-container" :tasks="tasks"></gantt>
</div>
</template>
<script>
import Gantt from './components/Gantt.vue';
export default {
name: 'app',
components: {Gantt},
data () {
return {
tasks: {
data: [
{id: 1, text: 'Task #1', start_date: '2020-01-17', duration: 3, progress: 0.6},
{id: 2, text: 'Task #2', start_date: '2020-01-20', duration: 3, progress: 0.4}
],
links: [
{id: 1, source: 1, target: 2, type: '0'}
]
},
}
}
}
</script>
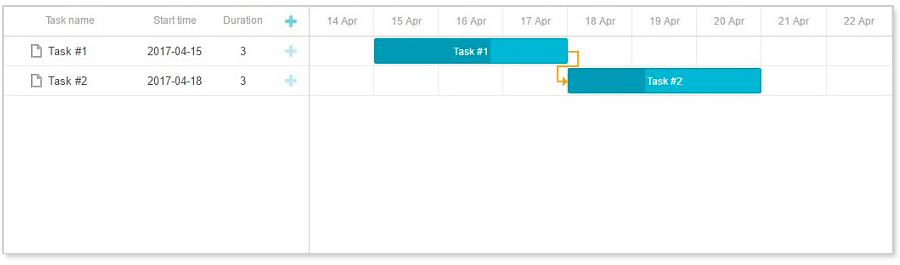
Now, we should see the Gantt chart with predefined tasks on a page.
Listening changes and handling events
Let’s say we need to trace changes in Gantt made by the user and process them somehow – show the details of the selected item in a separate form, keep data model of the parent component up to date, or send these changes to the backend. In other words, we need a way to let the rest of the app know what happens inside Gantt.
To do so we can create a DataProcessor with a custom router object, where the router is a function and $emit DataProcessor events to the parent component.
As a simple demonstration, let’s implement a ‘changelog’ feature – we’ll write all changes made in Gantt in a neat list somewhere on the page.
Firstly, go into the Gantt component and add code that will trace and emit changes of dhtmlxGantt. Add the following code right after the gantt.init call:
gantt.createDataProcessor((entity, action, data, id) => {
this.$emit(`${entity}-updated`, id, action, data);
});
It adds handlers to the add/update/delete events for the links and tasks. If some particular handler is called, it will trigger vue event on our component with parameters.
The next step is to add listeners for these events into the app component and write a log of actions in another div.
Let’s extend the app component with the required functionality:
import Gantt from './components/Gantt.vue';
export default {
name: 'app',
components: {Gantt},
data () {
return {
tasks: {
data: [
{id: 1, text: 'Task #1', start_date: '2020-01-17', duration: 3, progress: 0.6},
{id: 2, text: 'Task #2', start_date: '2020-01-20', duration: 3, progress: 0.4}
],
links: [
{id: 1, source: 1, target: 2, type: '0'}
]
}
}
},
methods: {
addMessage (message) {
this.messages.unshift(message)
if (this.messages.length > 40) {
this.messages.pop()
}
},
logTaskUpdate (id, mode, task) {
let text = (task && task.text ? ` (${task.text})`: '')
let message = `Task ${mode}: ${id} ${text}`
this.addMessage(message)
},
logLinkUpdate (id, mode, link) {
let message = `Link ${mode}: ${id}`
if (link) {
message += ` ( source: ${link.source}, target: ${link.target} )`
}
this.addMessage(message)
}
}
}
What you can see here – we’ve added an array property where we’re going to store log entries, a method that adds a new message to the top of that array (our log will show new entries first). Also, we’ve added two more methods that will create log messages for actions done with tasks and links and add them to the message stack.
And finally, update a template of the app component to utilize these functions:
<template>
<div class="container">
<div class="right-container">
<ul class="gantt-messages">
<li class="gantt-message" v-for="message in messages">{{message}}</li>
</ul>
</div>
<gantt class="left-container" :tasks="tasks" @task-updated="logTaskUpdate" @link-updated="logLinkUpdate"></gantt>
</div>
</template>
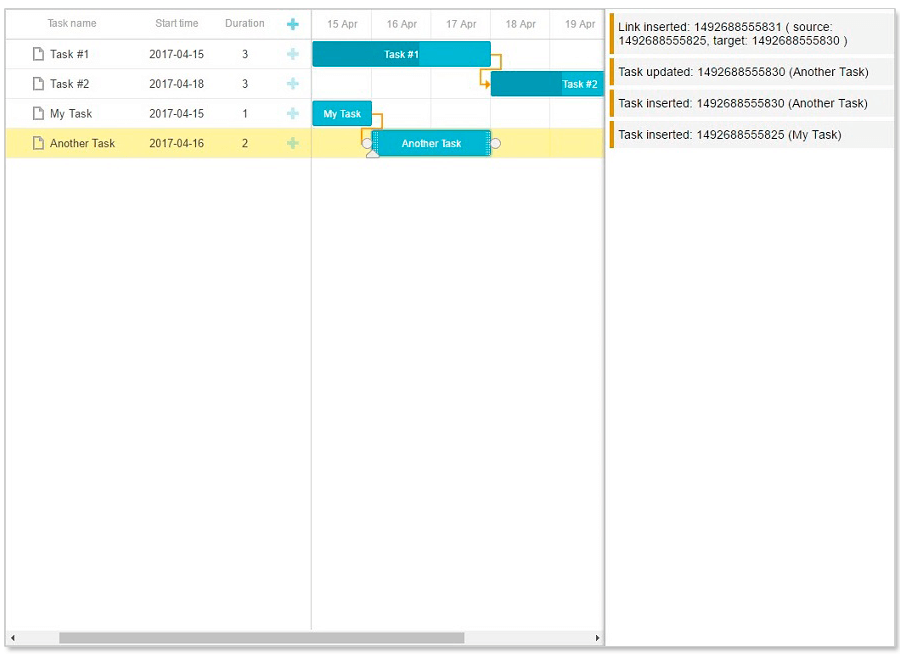
We’ve added a simple two-column layout, attached our log handlers to the Gantt events that we emit from the Gantt module, added a container for log messages and bound them to our log messages stack.
Now, if we make some changes to Gantt, messages should be shown on the right side.
If you want to display some info about the selected tasks, proceed to the instructions below.
To show information about selected tasks, we can capture API events of DHTMLX Gantt (‘onTaskSelected‘) and $emit them to the parent component. We can also use the ‘onTaskIdChange‘ event to update information after changing the task id.
Open the Gantt chart component and add the following code right before gantt.init call:
gantt.attachEvent('onTaskSelected', (id) => {
let task = gantt.getTask(id);
this.$emit('task-selected', task);
});
gantt.attachEvent('onTaskIdChange', (id, new_id) => {
if (gantt.getSelectedId() == new_id) {
let task = gantt.getTask(new_id);
this.$emit('task-selected', task);
}
});
Here we’ve added the onTaskSelected handler that is going to trigger a ‘task-selected’ event.
Open the app component to add a selection handler to it. We need to add some necessary elements to our template as well. It should look like this:
<template>
<div class="container">
<div class="right-container">
<div class="gantt-selected-info">
<div v-if="selectedTask">
<h2>{{selectedTask.text}}</h2>
<span><b>ID: </b>{{selectedTask.id}}</span><br/>
<span><b>Progress: </b>{{selectedTask.progress|toPercent}}%</span><br/>
<span><b>Start Date: </b>{{selectedTask.start_date|niceDate}}</span><br/>
<span><b>End Date: </b>{{selectedTask.end_date|niceDate}}</span><br/>
</div>
<div v-else class="select-task-prompt">
<h2>Click any task</h2>
</div>
</div>
<ul class="gantt-messages">
<li class="gantt-message" v-for="message in messages">{{message}}</li>
</ul>
</div>
<gantt class="left-container" :tasks="tasks" @task-updated="logTaskUpdate" @link-updated="logLinkUpdate" @task-selected="selectTask"></gantt>
</div>
</template>
Here we’ve added another container, which is bound to the selectedTask property of the app component using “v-if” directive. Besides, we’ve added a handler for the “task-selected” event we now emit.
Make sure to add this property to the app component:
selectedTask: null
And add the selectTask method, which is used in the handler we’ve defined above:
selectTask: function(task){
this.selectedTask = task
}
Thus, each time a user selects a task inside Gantt, the component emits the ‘task-selected’ event. Then this event is captured by the app component. Inside the event handler, we update the selectedTask property, which in its turn invokes a repaint of the .gantt-selected-info element with task details.
Note that the task object has the start_date/end_date properties of Date type and progress completion in float type – these should be formatted in a human-friendly form before being added to the page.
It’s implemented using toPercent and niceDate filters, which we define like this:
filters: {
toPercent (val) {
if(!val) return '0'
return Math.round((+val) * 100)
},
niceDate (obj){
return '${obj.getFullYear()} / ${obj.getMonth()} / ${obj.getDate()}'
}
}
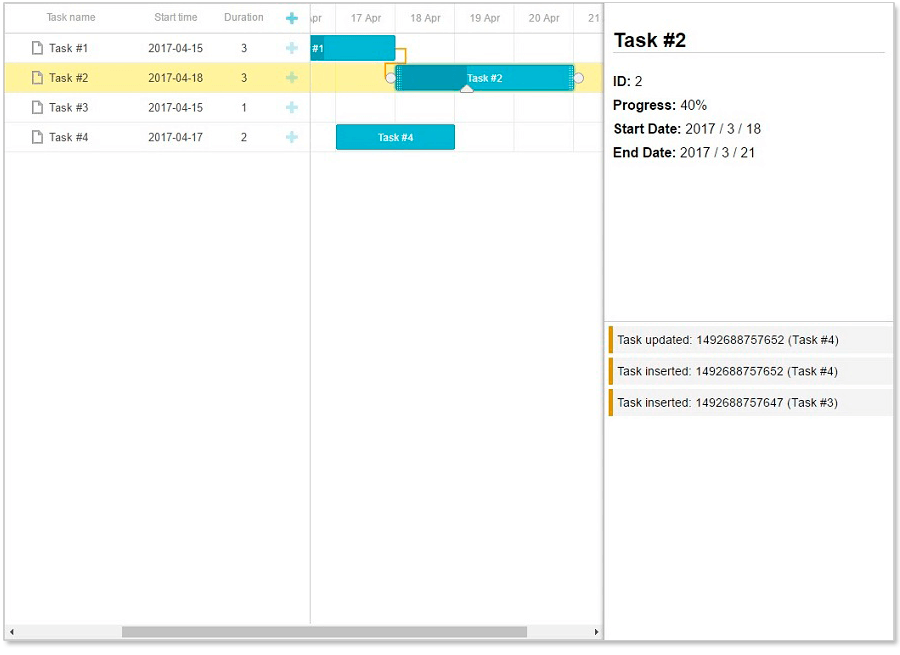
Now, if we run our app and select a task, we should see that its info is shown on the right.
So, we’ve created a simple Gantt chart with the help of DHTMLX Gantt and Vue.js. The results of our work can be found on GitHub. If you follow the instructions above and meet any difficulties, don’t hesitate to share them with us.
Which technologies/frameworks are you using?
We need your feedback to provide the right integrations at the right time. Please leave your requests here:
Thank you in advance and stay tuned for new tutorials!
The post How to Use DHTMLX Gantt with Vue.js Framework [Demo] appeared first on DHTMLX Blog.