If you need to print a Gantt chart that you created with dhtmlxGantt, we now provide an online export service that allows you to export your chart to PDF or PNG formats. To see how the export service works, try this demo. If you need technical details, read this article in the documentation. Note that […]
↧
Export to PDF/PNG for dhtmlxGantt
↧
DHTMLX 4.0 Released with New Look and Faster Performance
We are happy to introduce the release of DHTMLX 4.0, a complete JavaScript UI library. This update includes performance improvements, bug fixes and significant increasing in speed. Also the new release brings smooth rendering and improved look and feel provided by the redesigned skins. One of the important updates is the common way of data […]
↧
↧
dhtmlxScheduler Updated to Version 4.1
We are pleased to announce the release of dhtmlxScheduler 4.1, an embeddable JavaScript scheduling calendar for planning and managing events and tasks. Version 4.1 introduces a new flat skin, enhanced export to PNG and PDF, the ability to resize event boxes in Month View, and other useful features and improvements. Moreover, the updated dhtmlxScheduler allows […]
↧
dhtmlxGantt 4.0 is Rolling Out: Meet New Fast Gantt
Let’s finally begin a fresh chapter of dhtmlxGantt history – we release the version 4.0, a major and quite important update of the library. It brings you smart rendering feature, undo-redo functionality, and more. Below you’ll find more details. Dive in!

Smart Rendering
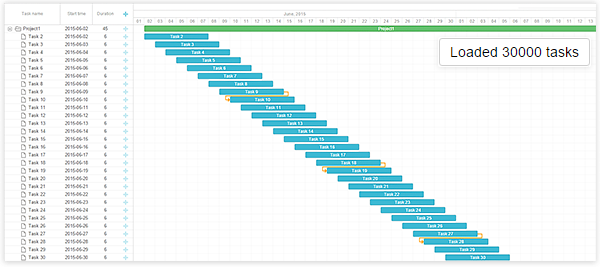
100, 1000, 10000 and more tasks are not a problem anymore. The rendering of tasks became much and much faster due to the mode that allows not to load all tasks at once but render them as far as they appear on the screen.
Moreover, even if your project with gantt doesn’t contain thousand of tasks, the rendering time will be increased since 4.0 due to optimization of loading and rendering in general.
Undo/Redo Extensions
Since dhtmlxGantt 4.0, all the actions made to gantt can be undone and redone. You may now make changes to your gantt without worry of how to return everything back.
API changes
Besides new features, the update brings quite big changes and cleanup of the component API. The aim of these changes is to make the component structure clearer and more coherent. In particular, the changes concern the following:
– Most used helpers, such as dhtmlxMessage, dhtmlxDataProcessor and dhtmlxAjax has been added to gantt namespace.
– Legacy code has been removed from the component, as a result it no longer pollutes the global namespace with unnecessary variables and functions.
All of this brings two main benefits:
1) Gantt documentation becomes more complete and covers all aspects of work with dhtmlxGantt.
2) The component doesn’t have any API or CSS conflicts with dhtmlxSuite or dhtmlxScheduler libraries.
Migration to dhtmlxGantt 4.0
dhtmlxGantt 4.0 contains fallbacks for older API and is backward compatible with the code written for the previous versions.
This means that most likely you won’t need to modify any of your existing code in order to update component, although we advise to make some changes for compatibility with the next major update (5.0). You may find the migration guide here.
If you have any problems with migrations, feel free to open a ticket, submit your questions on forum or send us an email to support[at]dhtmlx.com.
Full what’s new list with detailed description is available in our documentation. You can download Standard Edition of dhtmlxGantt here. PRO users will get the newsletter with the updated version soon.
We are looking forward to hear your feedback!
The post dhtmlxGantt 4.0 is Rolling Out: Meet New Fast Gantt appeared first on DHTMLX Blog.
↧
dhtmlxSuite 4.6: Big Christmas Bug Fixes and Promised Today Button
“It is not considered respectable to spend the New Year with debts” DHTMLX dev team thought and fixed all known bugs that were found in 4.5. So, meet dhtmlxSuite 4.6 that works better and more stable.

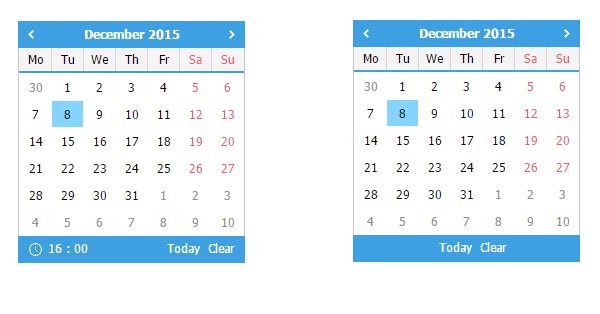
Today and Clear Buttons in dhtmlxCalendar
But it won’t be 4.6 without new feature. And based on your votes in our roadmap we realized that we definitely must add Today and Clear Buttons to dhtmlxCalendar.
Multiple fixes and improvements
Like was already said, this update comes with lots of bug fixes and improvements. Due to your reports, we were managed to find all these fixes. Full list of them can be found here.
Download the Standard Edition here.
What’s next
Meanwhile, DHTMLX Team is working hard on new major update – dhtmlxSuite 5.0. Check out our roadmap and take a part in voting for the new functionality.
The post dhtmlxSuite 4.6: Big Christmas Bug Fixes and Promised Today Button appeared first on DHTMLX Blog.
↧
↧
DHTMLX Little-Known Features: Custom Column Type in Grid
In this article, we would like to continue to share with you small tips and tricks that allow you use DHTMLX components more efficiently and enjoy every single minute you spend with our library.
This time, we’ll talk about dhtmlxGrid. It’s a full-featured JavaScript grid control that provides advanced functionality, powerful data binding, and fast performance with large data sets. This component gives you a possibility to specify the content type for a column. There is a plenty of available column types from a simple editable text field to date picker. But what if provided functionality is not enough for you? Well, it’s always possible to use custom column type. Let’s look at some examples.

First of all, let’s talk about the basic initialization. You can check this documentation page for the details, but for now, this initialization sequence is what we need:
myGrid = new dhtmlXGridObject('gridbox');
myGrid.setImagePath("./codebase/imgs/");
myGrid.setHeader("Sales, Book Title, Author, Price");
myGrid.setInitWidths("70,230,230, *");
myGrid.setColAlign("right,left,left,right");
myGrid.setColTypes("dyn,ed,ed,price");
myGrid.setColSorting("int,str,str,int");
myGrid.init();
myGrid.load("./data.json","json");
What we’re particularly interested in is this line of code:
myGrid.setColTypes("dyn,ed,ed,price");
This is where you define what column types you want to use. In this case we’ve created one dyn column that applies different coloring and marking based on the value, two simple column with editable cells that can be created using the ed parameter, and a price column that treats data as price.
The result is shown below:

As you can see, the dollar sign is used by default in the Price column. In case, you already have an array of data you want to use and such behavior is not what you expected, you can create your own column type.
Let’s start from read-only cells. For example, we want use euros as a currency. Here’s the code:
function eXcell_myPrice(cell){ //the eXcell name is defined here
if (cell){ // the default pattern, just copy it
this.cell = cell;
this.grid = this.cell.parentNode.grid;
}
/* read-only cell doesn't have edit method */
this.edit = function(){}
/* the cell is read-only, so it's always disabled */
this.isDisabled = function(){ return true; }
this.setValue=function(val){
/* actual data processing */
this.setCValue("<span>€ </span><span>"+val+"</span>",val);
}
}
/* nests all other methods from the base class */
eXcell_myPrice.prototype = new eXcell;
The most important parts in this code are the name of the new type and data processing formula. To use this newly created cell type you can change this line:
myGrid.setColTypes("dyn,ed,ed,myPrice");
Here’s the result:

If you want to add a possibility to edit the cells, you should do the following:
- add to your new cell an option to use methods of the “ed” type;
- define the getValue() method that returns the current cell value; it may be used by standard API, and it’s necessary for a normal edit operation;
- define the edit() method that is called when the grid is switched to the edit state (not declared explicitly, nested from the ‘ed’ type);
- define the detach() method that is called when the grid is switched back to the normal state (not declared explicitly, nested from the ‘ed’ type);
So, here’s the minimal amount of code required to add the editing feature:
function eXcell_myPrice(cell){ //the eXcell name is defined here
if (cell){ // the default pattern
this.cell = cell;
this.grid = this.cell.parentNode.grid;
eXcell_ed.call(this); //uses methods of the "ed" type
}
this.setValue=function(val){
/* actual data processing */
this.setCValue("<span>€ </span><span>"+val+"</span>",val);
}
this.getValue=function(){
/* getting the value */
return this.cell.childNodes[1].innerHTML;
}
}
/* nests all other methods from the base class */
eXcell_myPrice.prototype = new eXcell;
Now, newly created cell type is editable:

Both edit() and detach() methods are not declared explicitly in this case. But you can always define them by yourself if you want to enable some extra functionality. To learn more about the custom cell types, check this documentation page.
The post DHTMLX Little-Known Features: Custom Column Type in Grid appeared first on DHTMLX Blog.
↧
Five Main News Events Happened in 2015 [Infographic]
2016 is getting closer, many new updates and news will be released for you, but now we’d like to sum up the outgoing year. Here is our 2015 in infographic:

1) dhtmlxSuite updated 5 times! These updates brought us three new components – Sidebar, Carousel and List. Besides, lots of new features were added and many improvements were made.
2) dhtmlxGantt has grown to the version 4.0! The control greatly extended its functionality – tasks grouping, auto-scheduling, multi-selection, fullscreen mode, smart rendering and many other new features made our gantt chart more powerful.
3) 7 new tutorials and tools! They are developed to help you to use our components with other technologies and frameworks including MeteorJS, Firebase, Ruby on Rails, Laravel, and Yii 2.
4) 2 new macro components! dhtmlxDataSelector and dhtmlxFileSelector were developed to simplify the process of work with your database and file system.
5) We shared 2 public roadmaps! Two trello boards with our plans and your wishes of future functionality of dhtmlxGantt and dhtmlxSuite are available for voting and your active participation in libraries’ lives.
See you in 2016! ;)
The post Five Main News Events Happened in 2015 [Infographic] appeared first on DHTMLX Blog.
↧
Things You Should Know About Building Web Application in 2016
Sometimes being a pioneer in your sphere of activity is a key to success. On the other hand, your strategy could be based on a clear and profound understanding of previous experience and strict adherence to the current trends and tendencies. Sounds reasonable, too.

Despite the chosen recipe, it’s always helpful to summarize what trends were on the rise during the year. Such knowledge can help you predict tomorrow’s fashion in the world of web development and be on the crest of the wave. That’s why we collect some of the most significant trends that you should keep in mind if you plan to build web applications in 2016. It’s not a “Web Development 101” article. More like a list of things that we noticed during the year as web developers. We hope it will be helpful to you.
UI and UX
It seems like a course to minimalism that we can observe in web design nowadays is a serious thing. Leave nothing but the essential elements on your page is how this rule looks like in a nutshell. Such approach reduces the loading time that is great in case of mobile applications. Since user interface doesn’t overload with tons of elements it’s easier to develop clean and responsive application that is, once again, a plus in case of mobile users.
We could say that flat design is an embodiment of the minimalist approach. And even if there were any doubts about the fact that flat design is on the rise, after the release of the latest versions of iOS and Android, it received the attention it deserved. It looks fresh and clean both on mobile devices and big screens. Based on this we also think about new skin for dhtmlxSuite to provide the library fresh and modern look.
Since minimalist and neat looking web applications hold more and more prominence, it’s natural that bright colors become the primary means of expression. It’s a good decision to personalize your app through the combination of bright colors. Look around you and you’ll see this is not just a web thing. For example, fashion and interior design follow the same trend. So, if people want to see rainbows of bright colors, why not to use the same approach in the web? But you should always keep in mind that knowing of limits is the must. There’s no need turn your web page into the palette of acid colors.
Single page apps are the kings of the web. “Less click. More scroll” This is how one of the most important rules of web design looks like. Probably the main reason behind the fact that single page solutions are so popular is a sustainable reluctance of a mobile user to click again and again to get deeper into a site. As well as the fact that the parallax scrolling looks just awesome.
Animation can draw the eye or engage a user during the loading process. The animated menu that appears on the screen confirms the action’s success. Moreover, it shows the user where on the menu they can view the window later.
Mobile Web
It’s not a secret that the overall number of mobile devices in web grows from year to year. You can check this article on Mobile Marketing Statistics 2015 to get some info about the current state of things. And here are some tips that could help you be at ease in case you decide to build a mobile version of your app.
Think about the advanced responsiveness. There is a large amount of mobile devices of different shapes and sizes. Your job is to be completely sure that your application will look as it was initially designed on every single one of them. Buttons should be big enough to tap them comfortably, navigation should be easy to access, and information should be presented in accessible and easy-to-digest format. We start working hard on responsiveness of DHTMLX library and will continue improving it.

Reduce the size of your CSS and JavaScript files. If you use CSS frameworks like Bootstrap, you should remember that they can be pretty large and contain unused code that increases the loading time. To avoid this problem you can uses special tools that remove the code you don’t use. Take a look at uncss for example. But remember that uncss can’t pick up dynamic styles. We can say the same thing about your JavaScript code. It’s a good practice to use variable names that make sense to a human. Such approach simplifies the code maintenance. But variable names don’t affect the way your application works. So, why don’t use short equivalents instead of full-length variable names? You can use uglify, the tool that makes your JavaScript code unreasonable for a human mind, but usually much smaller.
When using dhtmlxSuite, we advice you to use libCompiler to reduce the size of you .js/.css files. It will be helpful in case if you don’t use all the components of the library but only some of them.
Other Useful Tips
Let’s continue with some general advice you should keep in mind during the development process.
Let’s start with the security. When a user signs up, send him an e-mail with a link that can be used to confirm its e-mail address. In case the user changes the e-mail address, repeat this operation. When you work with passwords, you should salt and hash them first. Despite the known problems with certificates, there’s nothing better than good old SSL. You should use it along with HSTS. Don’t check server credentials (e.g., database passwords, API keys, etc.) into source control.
NoSQL databases are something you should pay attention to. It’s a technology that developers use more widely during the last couple of years. It was developed to match the scale at which data is being produced and accessed. New storage and processing methods require a faster response and better performance and power. Probably, we won’t see the full switch to noSQL databases the next year, but you definitely should learn more about this technology.
Don’t forget about the Internet of Things. Designers and developers need to take the challenge of designing and developing for cars, robots and LCD’s.
That’s all for today. We hope that this article provides you with some useful info. One more thing before saying good bye. You should always remember that your primary intention is to create something that based primarily on the upon the needs of your users. There’s no need to stay trendy despite the end-user opinion.
The post Things You Should Know About Building Web Application in 2016 appeared first on DHTMLX Blog.
↧
Using dhtmlxGantt with Laravel Framework [Tutorial]
Our developers always try to provide you with the possibility to use our components in different ways. In this article, we’ll talk about dhtmlxGantt. We’ll learn how to use this component with the Laravel framework. Laravel is a free, open-source PHP web application framework. Laravel was created for the development of web applications following the model–view–controller (MVC) architectural pattern.

It will be a step-by-step guide intended both for developers who have already been familiar with Laravel and those of you who only starts working with it.
Installing Laravel
We’ll use Composer to install Laravel. It’s a dependency manager for PHP that allows you add required packages to your projects in a fast and easy way. Usually, you can find it in your Linux repository. In another case, you can download installation files from its home page.
To learn how you can install Laravel, you can follow this installation guide. Here’s one of the available opportunities. First of all, we need to create a folder for our project and download the Laravel packages. Run in your terminal:
composer create-project laravel/laravel --prefer-dist dhtmlxGantt
This code will create the dhtmlxGantt folder and load the Laravel files along with its dependencies into it.
Now we need to add dhtmlxConnector to our project. It’s a helper server-side library that enables access to external data sources and backend systems. To do so, enter the working directory and add the required package using Composer:
cd dhtmlxGantt
composer require dhtmlx/connector-php
composer require dhtmlx/connector-php
One more thing before getting started. Download the dhtmlxGantt package and unpack its content within the public/dhtmlxGantt directory.
That’s it. Preparations are finished, and we can continue creating the Gantt chart.
Create a Data Source
As an example, let’s use a previously created database. Here’s the direct link to a zip archive that contains the project that you can use as an example of how different DHTMLX components can work with Laravel. Inside you can find an SQL dump file named dhtmlx_samples.sql. Let’s use it to create a local database copy. In case of MySQL you should run the client:
mysql -u root -p
Now you can create a new database and import the data from the dump file:
CREATE DATABASE gantt;
USE gantt;
\. /path/to/file/dhtmlx_samples.sql
USE gantt;
\. /path/to/file/dhtmlx_samples.sql
Done. The database is created. Our next step is to create a the Gantt chart itself.
Create the Gantt Chart
As it was said before, Laravel follows the MVC architectural pattern. Since MVC means Model-View-Controller, the process of creation will consist of three main stages.
Create a Model
To access the data we need to specify the appropriate model class. You should create two files within the app directory of your project.
The first one is GanttTask.php:
<?php
namespace App;
use Illuminate\Database\Eloquent\Model;
class GanttTask extends Model
{
protected $table = "gantt_tasks";
public $primaryKey = "id";
public $timestamps = false;
}
namespace App;
use Illuminate\Database\Eloquent\Model;
class GanttTask extends Model
{
protected $table = "gantt_tasks";
public $primaryKey = "id";
public $timestamps = false;
}
And here’s the second one, GanttLink.php:
<?php
namespace App;
use Illuminate\Database\Eloquent\Model;
class GanttLink extends Model
{
protected $table = "gantt_links";
public $primaryKey = "id";
public $timestamps = false;
}
namespace App;
use Illuminate\Database\Eloquent\Model;
class GanttLink extends Model
{
protected $table = "gantt_links";
public $primaryKey = "id";
public $timestamps = false;
}
Create the View Object
Create a new file with name gantt.php within the resources/views directory of your project. Then and add the following code:
<!DOCTYPE html>
<head>
<meta http-equiv="Content-type" content="text/html; charset=utf-8">
<script src="dhtmlxGantt/codebase/dhtmlxgantt.js"></script>
<link rel="stylesheet" href="dhtmlxGantt/codebase/dhtmlxgantt.css">
</head>
<body>
<div id="gantt_here" style='width:100%; height:250px;'></div>
<script type="text/javascript">
/* chart configuration and initialization */
gantt.config.xml_date = "%Y-%m-%d %H:%i:%s";
gantt.config.step = 1;
gantt.config.scale_unit= "day";
gantt.init("gantt_here", new Date(2010,7,1), new Date(2010,8,1));
/* refers to the 'data' action that we will create in the next substep */
gantt.load("./gantt_data", "xml");
/* refers to the 'data' action as well */
var dp = new gantt.dataProcessor("./gantt_data");
dp.init(gantt);
</script>
</body>
Create the Controller
Now, let’s configure the Controller object. Before we go any further, let’s take a look at how GanttConnector works. Here’s an example:
$connector = new GanttConnector(null, "PHPLaravel");
$connector->render_links(new $modelName, $id, $links);
$connector->render_table(new $modelName, $id, $tasks);
$connector->render_links(new $modelName, $id, $links);
$connector->render_table(new $modelName, $id, $tasks);
The GanttConnector constructor takes 2 parameters: null means that we want to use a model, not a database; PHPLaravel – the module for working with PHP.
The render_links method configures connector, retrieves data from a table with links and takes three parameters: the method creating a model for links, the name of the link id, and a comma-separated list of rendered links.
The render_table method configures connector and retrieves data from a table with tasks. It takes three parameters as well: the method creating a model for tasks, the name of the task id, and a comma separated list of rendered tasks.
To configure the Controller object you should create a new file named GanttController.php within the app/Http/Controllers folder:
<?php
namespace App\Http\Controllers;
use App\GanttTask;
use App\GanttLink;
use Dhtmlx\Connector\GanttConnector;
class GanttController extends Controller
{
public function data() {
$connector = new GanttConnector(null, "PHPLaravel");
$connector->render_links(new GanttLink(), "id", "source,target,type");
$connector->render_table(new GanttTask(),"id","start_date,duration,text,progress,parent");
}
}
Final Steps: Environment, Routes, and CSRF Protection
There are three final steps left before you can test your application. Let’s start from the environment configuration. The .env file that resides in the root folder of your project will be used for that purpose. All that we need is to configure the database. Here are the four lines that we are interested in:
DB_HOST=localhost
DB_DATABASE=gantt
DB_USERNAME=root
DB_PASSWORD=yourpassword
DB_DATABASE=gantt
DB_USERNAME=root
DB_PASSWORD=yourpassword
You should define the hostname, name of the database that we’ve created earlier, username, and a password to allow Laravel use the data from a database.
The next step is to define the routes. Open the app/Http/routes.php file. Here’s the default routes configuration that you’ll find there:
Route::get('/', function () {
return view('welcome');
});
return view('welcome');
});
Here’s what it means, in a nutshell. When you open the root folder of your website in a browser, the GET request will be performed. As a result, the welcome page from the resources/views folder will be returned. In fact, the name of this file is welcome.blade.php but Laravel disregards file extensions. What we need to do is to tell Laravel that the previously created view, gantt.php, should be returned. The other step is to use GanttController.php to save and load data. All you need to do is to replace the existing route with the following:
Route::get('/', function () {
return view('gantt');
});
Route::match(['get', 'post'], '/gantt_data', "GanttController@data");
return view('gantt');
});
Route::match(['get', 'post'], '/gantt_data', "GanttController@data");
One more step before we can run the project. Laravel protects your application from cross-site request forgeries by generating a CSRF “token” for each active user session managed by the application. You can read more about the mechanisms of protection on this page if you want, but what we need to do now is to exclude one particular URI from CSRF protection. The one that triggered when created data is supposed to be saved. We need to add a proper value to the $except property:
protected $except = [
'gantt_data'
];
'gantt_data'
];
That’s it! Now we can test the application.
Running the Application
Open the root directory of your project and run:
php artisan serve
Here’s the typical output:
Laravel development server started on http://localhost:8000/
Open http://localhost:8000/ in your browser and you’ll see the working Gantt chart:

Here are the tasks from the database dump file that we’ve imported earlier. You can edit them or create your own, using the “+” button.
That’s all. We hope you have enjoyed the tutorial. The final application logic was not the goal of this article, but the interface built here is a good start for creating a fully-functional web application.
The post Using dhtmlxGantt with Laravel Framework [Tutorial] appeared first on DHTMLX Blog.
↧
↧
DHTMLX Little-Known Features: How To Save Login/Password in Browser
From time to time we are asked to offer an easy way to use real HTML form with dhtmlxForm. So we’d like to share this tip with you and show you the working sample of login form that forces a browser to save credentials for login/password form.

Here is a complete demo (Enter “admin / 1” login details to check it). If you want to know how to make it in your application, continue reading this mini tutorial.
Step 1.
First of all, let’s create a real html form:
<form id="realForm" action="check.php" method="POST"></form>
Do not add inputs into it, this will be done by dhtmlxForm.
Step 2.
Add hidden iframe on page to submit real form without the page reloading:
<iframe border="0" frameBorder="0" name="submit_ifr" class="submit_iframe"></iframe>
And you need some css to hide it from eyes:
<style>
iframe.submit_iframe {
position: absolute;
width: 1px;
height: 1px;
left: -100px;
top: -100px;
font-size: 1px;
}
</style>
iframe.submit_iframe {
position: absolute;
width: 1px;
height: 1px;
left: -100px;
top: -100px;
font-size: 1px;
}
</style>
Step 3.
Add target attr to form to force submit to the hidden iframe:
<form id="realForm" action="check.php" method="POST" target="submit_ifr"></form>
Step 4.
Now it’s time to add dhtmlxForm:
var formData = [
{type: "settings", position: "label-left", labelWidth: 75, inputWidth: 150},
{type: "block", blockOffset: 30, offsetTop: 15, width: "auto", list: [
{type: "label", label: "Please introduce yourself", labelWidth: "auto", offsetLeft: 35},
{type: "input", label: "Login", name: "dhxform_demo_login", value: "", offsetTop: 20},
{type: "password", label: "Password", name: "dhxform_demo_pwd", value: ""},
{type: "button", name: "submit", value: "Let me in", offsetTop: 20, offsetLeft: 72}
]}
];
var myForm = new dhtmlXForm("dhxForm", formData);
Step 5.
Add an event handler for submitting (here instead of dhtmlxForm we’ll submit the real form):
myForm.attachEvent("onButtonClick", function(name) {
if (name == "submit") {
document.getElementById("realForm").submit();
}
});
if (name == "submit") {
document.getElementById("realForm").submit();
}
});
Step 6.
Here is the server side code you need:
<?php
header("Content-Type: text/html; charset=utf-8");
if (@$_REQUEST["dhxform_demo_login"] == "admin" && @$_REQUEST["dhxform_demo_pwd"] == "1") {
$state = 1;
} else {
$state = 0;
}
print_r("<meta http-equiv='Content-Type' content='text/html; charset=UTF-8'/>");
print_r("<script> try { parent.submitCallback(".$state."); } catch(e) {};</script>");
?>
Final Step 7.
Add submitCallback function on client which will parse server response:
function submitCallback(status) {
if (status == 1) {
document.location.href = "secret.html";
} else {
// reset form
myForm.setFormData({dhxform_demo_login: "", dhxform_demo_pwd: ""});
}
}
if (status == 1) {
document.location.href = "secret.html";
} else {
// reset form
myForm.setFormData({dhxform_demo_login: "", dhxform_demo_pwd: ""});
}
}
As a result you have a login/password form that allows you to save credentials in browsers. We’ve set up our server so that if you enter the credentials “admin / 1” you’ll get to the secret page.

We hope this piece of information was useful for you; and feel free to use it in your applications. Share your comments below!
The post DHTMLX Little-Known Features: How To Save Login/Password in Browser appeared first on DHTMLX Blog.
↧
dhtmlxSuite 4.6.1 with latest fixes and improvements is out [PRO]
We are glad to provide you bug fixes and improvements that were found in dhtmlxSuite 4.6. Full list of fixes can be found here.
Moreover, small fixes were also added to dhtmlxGrid, dhtmlxTree and dhtmlxTreeGrid components.

The updated version is available by the same link as dhtmlxSuite 4.6. So, just re-download the package.
Based on our updated license policy, this update is available for PRO users only. Users of Standard Edition will be able to get these fixes in future minor or major update.
The post dhtmlxSuite 4.6.1 with latest fixes and improvements is out [PRO] appeared first on DHTMLX Blog.
↧
Top Five Samples Show You Need to Choose dhtmlxGrid
If you’re not familiar with our grid component yet, then you should know that dhtmlxGrid is a js data grid control with a range of powerful features, fast performance and ability to work work with big datasets. dhtmlxGrid has such an extended functionality, but in this article we’ll point out top 5 samples that are most popular among our users.
1. Using extended cells technology
You can define the formatting for each column of the gridview in javascript and the editor to edit it. For more details and the list of available cell types check this documentation guide.

It’s surely one of the essential features for all JavaScript data grids. You can add rows to your grid any time by using API methods. You should specify the position where the row should appear. Deleting row is easy as well.

Our grid library also provides an extension for filtering data on the client-side. You can set filter for different columns in grid.

Still the most used way for data loading is loading from JSON format, you can use 2 JSON formats – Basic and Native. Documentation can be found here.

50,000 records in our js grid table is not a limit, but still check the sample and enjoy smooth performance. In this sample we put 50,000 records into a table in a Mysql database filled with random words. dhtmlxGrid using Ajax loads visible records only. Find related docs here.

With this grid javascript library, you can easily create nice-looking, js grid tables with in-cell editing, filtering, searching, and grouping and other capabilities. More samples can be found here.
The post Top Five Samples Show You Need to Choose dhtmlxGrid appeared first on DHTMLX Blog.
↧
Behind the Scenes: On the Way to dhtmlxSuite 5.0
Time flies fast. Our JavaScript widget library is almost ready to be updated to the version 5.0. We want you to be aware of the current status of our hard work on this long-awaited update, so continue reading to get know how is it going.

As it was announced in dhtmlxSuite roadmap, we are going to release DHTMLX framework, new tree control and updated visual designer with form builder tool. Besides, we decided to provide a new skin based on Google Material design. So, in this article we’ll share our intermediate results with form builder and new skin.
Online Form Creator
We started to update Visual Designer with adding a form builder tool. You’ll be able to create any types of forms fast with less effort. Online form builder comes with the most useful functionality: drag and drop, import/export of created forms and live preview.

DHTMLX Material
Following modern tendencies and based on your votes, we decided to create a new skin for dhtmlxSuite controls.
Thinking about new skin for dhtmlxSuite. What's about Google's Material Design? Vote here: https://t.co/6FbWbec0Bu pic.twitter.com/iAEDrg7bXS
— DHTMLX (JS library) (@dhtmlx) January 5, 2016
The users of our JavaScript UI library will get familiar look and feel of popular Google Material Design. Each element of our javascript ui controls is carefully analyzed by our designers, so the result must be worthy.
Other important updates, such as DHTMLX Framework and TreeView component, are also ready and are passing the testing phase. Our plans are also available online here.
More details about Suite 5.0 coming soon.
The post Behind the Scenes: On the Way to dhtmlxSuite 5.0 appeared first on DHTMLX Blog.
↧
↧
dhtmlxScheduler 4.3.25: Maintenance Fix is Out [PRO]
For quite a long time we haven’t officially released any updates of our JavaScript Scheduler though the work on its improvement wasn’t stopped. So, now we’d like to announce a release of more stable version of dhtmlxScheduler, the version 4.3.25.

What’s fixed in dhtmlxScheduler 4.3.25:
- Touch support – trigger tap and double tap on multiday area of Day/Weeks/Units views
- Touch support – fix regression with event disappearing on start of touch-drag
- Timeline – fix onYScaleClick call when ignored columns are defined
- Timeline – fix incorrect state of event object after canceling drag and drop
- Tree Timeline – timeline_scale_class template should be applied to folder items
- dataProcessor – clearing scheduler while dataProcessor request is in progress should not cause JS error
- dataProcessor – fix incorrect state when adding and modifying recurring series when autoUpdate is disabled
- Day/Week views – fix event visibility when first/last hours of calendar are enabled
- Multiday Units View – fix default section on creation event with a double click
- General – occasional Chrome bug, when click and double click events stopped firing
- General – fixes for daylight savings time bugs in Safari
- and many other small fixes
Need to say, this update won’t bring any new functionality, but provide seamless performance and be free from small issues and bugs that appeared in 4.3.1. Based on our updated license policy, this update is available for PRO users only. Users of Standard Edition will be able to get these fixes in future minor or major update.
The post dhtmlxScheduler 4.3.25: Maintenance Fix is Out [PRO] appeared first on DHTMLX Blog.
↧
Wrappers for Suite Components from an AngularJS Fan
Emanuil Glavchev made an important contribution that many dhtmlx users were looking for. He has created wrappers for some of the DHTMLX library controls that enables using it with AngularJS Framework. So, most popular Suite controls, such as Grid, Tree, Layout, Form and more other can be now easily used in your Angular + DHTMLX projects.

Continue reading to learn about Emanuil’s contribution and the work he has done.
“What these directives represent are the wrappers for some of the DHTMLX components. As I require more of them I add more to the project. Each directive provides an interface to the underlying dhtmlx components. That interface in most cases does not encompass the complete API. I’ve handled the issue in 2 ways: one is letting the directive user get access to the underlying object at important times in its lifetime (in order to manually configure it additionally, or manipulate its data), whereas another way is registering the object in the controller scope usually via the dhxObj/dhx-obj attribute.
Despite that, I try to include in the directives interface all that I’m likely going to need most of the time. This is done because I mostly use DHTMLX+Angular.js for fast creation of prototype web applications, and it is really much easier when a component can be fully defined in the template without requiring additional code configuration in the controller other than attaching the actual data, which for prototyping purposes can also be often inlined in the template.
I’ve tried to add comments where absolutely necessary, however usually I stick quite close to the actual DHTMLX Api of the underlying components, which means of course you need to have DHTMLX handy. I find it important that for each directive, a demo exists in this application. This serves 2 purposes.
First it serves as a sort of environment in which all the directives can be easily tested. Secondly, the very application showcases the directive code, as well as the actual demo code that gets executed before one’s eyes. That makes the demo app not only into a testing environment, but also a sort of handbook, to which I often refer to remember how the directives are used. Naturally, as I add more directives or expand the functionality of the existing ones, I will update the demos accordingly to reflect this new functionality.
Final Note: Not being a professional Javascript/Angular.js developer, I do not claim to follow completely the established good principles of design, functionality and codestyle, but always remain open to correction and improvement. If anyone feels like they have something to add to any part of this and they want to share their knowhow, they will be most welcome.”
Note that to use it in commercial projects, you need to obtain appropriate license.
We want to thank Emanuil Glavchev one more time. You may find Angular+DHTMLX demos here. You are welcome to leave your comments and suggestions!
The post Wrappers for Suite Components from an AngularJS Fan appeared first on DHTMLX Blog.
↧
Using dhtmlxGantt with Ruby on Rails [Tutorial]
There’s no limit to perfection. And no limit to our intentions of providing you with different possible ways of combining our components with your favorite development tools. For example, you can check this tutorial that describes how you can use our dhtmlxGantt along with the Laravel framework.
This time, we’ll go a little bit further and offer you to add a new skill to your knowledge baggage. Let us introduce to you this step-by-step tutorial that covers the using of dhtmlxGantt along with Ruby on Rails.

Creating a New Project
If you don’t have Ruby on Rails installed, you can follow this installation guide. Installation method may defer according to the operating system you use, but it shouldn’t take long. After you finish installing Rails, you’ll be able to create a new project.
To do so, type in your terminal:
rails new path/to/your/project
Now, your first Ruby on Rails project is officially created. Before testing the application, let’s deal with creating a controller and routing.
Controllers and Routes
Controller’s primary task is to receive requests that users send to an application. To define which controller will receive a particular request, you use routing. Usually, applications have several routes and controllers. Different routes can be served by different actions. Actions collect the information that will be provided to a view.
Let’s create a new controller named home. Besides the controller, we’ll create a new action named index.
cd path/to/your/project
rails generate controller home index
rails generate controller home index
The output should confirm that new files were created. Now, let’s config the routing. Open the file config/routes.rb and find the following line at the very beginning of this file:
get 'home/index'
Then, replace it with this code:
root :to => 'home#index'
Now we can test our server. Run in your terminal:
rails server
Open in your browser http://localhost:3000/, and you’ll get this result:

Doesn’t look so impressive at this step, but everything works fine which is a good sign.
Let’s proceed with the views.
Unpacking dhtmlxGantt and Creating the Views
A view’s work is to display the information that was previously collected by an action in a human readable format. Before creating a new view, we need to download the dhtmlxGantt package.
The vendor directory of your project contains third-party code. This is where we’ll unpack the dhtmlxGantt files. It will take two steps:
1. Unpack the file codebase/dhtmlxgantt.js and the directory codebase/ext from the package to the directory vendor/assets/javascripts/ of your project
2. Unpack the file codebase/dhtmlxgantt.css and the directory codebase/skins from the package to the directory vendor/assets/stylesheets/ of your project
Now, we should add this new files to the precompile array. Open the config/initializers/assets.rb file and add the following code:
Rails.application.config.assets.precompile += %w( dhtmlxgantt.css )
Rails.application.config.assets.precompile += %w( dhtmlxgantt.js )
Rails.application.config.assets.precompile += %w( dhtmlxgantt.js )
Let’s now create a view. If there’s no controller-specific layout, Rails will use the app/views/layouts/application.html.erb. This file is a template for all pages that have common elements. We’ll use it to include dhtmlxgantt.js and dhtmlxgantt.js to our project. Open this file and replace the existing code with the following:
<!DOCTYPE html>
<html>
<head>
<title>Gantt</title>
<%= stylesheet_link_tag 'application', media: 'all', 'data-turbolinks-track' => true %>
<%= stylesheet_link_tag 'dhtmlxgantt', media: 'all', 'data-turbolinks-track' => true %>
<%= javascript_include_tag 'application', 'data-turbolinks-track' => true %>
<%= javascript_include_tag 'dhtmlxgantt', 'data-turbolinks-track' => true %>
<%= csrf_meta_tags %>
</head>
<body>
<%= yield %>
</body>
</html>
Now we can define a view for the home controller that we have created earlier. Open the file app/views/home/index.html.erb and add the DIV container for the Gantt chart along with the code that initializes the chart:
<div id="gantt_here" style='width:100%; height:800px;'></div>
<script>
gantt.init("gantt_here");
</script>
<script>
gantt.init("gantt_here");
</script>
We can check the changes that we’ve made. If you’ve stopped the server you can run it again (rails server), and here’s what you’ll see in your browser:

It’s already something. There’s a Gantt chart that allows you create and change new tasks. But at the moment, your application can’t save the changes. Let’s fix it.
Creating the Models
Our application requires two models: one for the tasks and one for the links between them.
Let’s create a model for the tasks first. Run in your terminal:
rails generate model Task text:string start_date:datetime duration:integer progress:float sortorder:integer parent:integer
As you noticed an ordinary task consists of its name, start date, duration, etc.
Now we can create a second model. For the links this time:
rails generate model Link source:integer target:integer link_type:string:limit1
And, finally, we can create a new database:
rake db:migrate
Optionally, you can add some tasks and links to your database. Open the Rails console:
rails c
And then, add the new tasks and links. For example:
Task.create :text=>"Task 1", :start_date=>"2015-10-25", :duration=>2;
Task.create :text=>"Task 2", :start_date=>"2015-10-27", :duration=>3;
Link.create :source=>1, :target=>2, :link_type=>"0";
Task.create :text=>"Task 2", :start_date=>"2015-10-27", :duration=>3;
Link.create :source=>1, :target=>2, :link_type=>"0";
When you finish, just type exit to close the Rails console.
Now we should add the code that allows us to save and load the data.
Creating Controllers to Work with the Data
Let’s create a new action for loading the data. Open the app/controllers/home_controller.rb file and add the following code that creates the data action:
def data
tasks = Task.all
links = Link.all
render :json=>{
:data => tasks.map{|task|{
:id => task.id,
:text => task.text,
:start_date => task.start_date.to_formatted_s(:db),
:duration => task.duration,
:progress => task.progress,
:sortorder => task.sortorder,
:parent => task.parent
}},
:links => links.map{|link|{
:id => link.id,
:source => link.source,
:target => link.target,
:type => link.link_type
}}
}
end
Now we should create a new controller task:
rails generate controller task
And add new actions for adding, changing, and deleting the data. To do so, open the app/controllers/task_controller.rb and add:
protect_from_forgery
def update
task = Task.find(params["id"])
task.text = params["text"]
task.start_date = params["start_date"]
task.duration = params["duration"]
task.progress = params["progress"]
task.sortorder = params["sortorder"]
task.parent = params["parent"]
task.save
render :json => {:status => "ok"}
end
def add
task = Task.create :text => params["text"], :start_date=> params["start_date"], :duration => params["duration"],
:progress => params["progress"], :sortorder => params["sortorder"], :parent => params["parent"]
render :json => {:tid => task.id}
end
def delete
Task.find(params["id"]).destroy
render :json => {:status => "ok"}
end
As you may have guessed, now it’s time to create the controller named link. Creating a new controller:
rails generate controller link
And don’t forget to add the code required for adding, changing, and deleting. Open the app/controllers/link_controller.rb file and add:
protect_from_forgery
def update
link = Link.find(params["id"])
link.source = params["source"]
link.target = params["target"]
link.link_type = params["type"]
link.save
render :json => {:status => "ok"}
end
def add
link = Link.create :source => params["source"], :target => params["target"], :link_type => params["type"]
render :json => {:tid => link.id}
end
def delete
Link.find(params["id"]).destroy
render :json => {:status => "ok"}
end
Now we need to define the routes to our new controllers and actions. Open the config/routes.rb file and add:
match "home/data", :to => "home#data", :as => "data", :via => "get"
post "home/data/task", :to => "task#add"
put "home/data/task/:id", :to => "task#update"
delete "home/data/task/:id", :to => "task#delete"
post "home/data/link", :to => "link#add"
put "home/data/link/:id", :to => "link#update"
delete "home/data/link/:id", :to => "link#delete"
post "home/data/task", :to => "task#add"
put "home/data/task/:id", :to => "task#update"
delete "home/data/task/:id", :to => "task#delete"
post "home/data/link", :to => "link#add"
put "home/data/link/:id", :to => "link#update"
delete "home/data/link/:id", :to => "link#delete"
We’re almost there. One more step. Open the app/views/home/index.html.erb file and add the code that initializes the chart, loads, and saves the data. Insert it between the tags:
gantt.config.xml_date="%Y-%m-%d %H:%i";
gantt.init("gantt_here");
gantt.load("<%= data_path %>");
var dp = new dataProcessor("<%= data_path %>");
dp.init(gantt);
dp.setTransactionMode("REST");
gantt.init("gantt_here");
gantt.load("<%= data_path %>");
var dp = new dataProcessor("<%= data_path %>");
dp.init(gantt);
dp.setTransactionMode("REST");
At least, we can check the final result. If you open your application in browser, you’ll see two tasks and a link between them. These are the tasks that we’ve created earlier.

You can create new tasks and links and change them. The application will save the changes to the database.
Hopefully, this article will be useful to you. Here you can also learn how to use dhtmlxScheduler with Ruby on Rails. Do not forget to visit our blog from time to time. There will be more helpful tutorials for you.
The post Using dhtmlxGantt with Ruby on Rails [Tutorial] appeared first on DHTMLX Blog.
↧
Scheduler Helper for PHP Updated to Version 1.1.0
We are glad to announce that Scheduler Helper for PHP was updated to the version 1.1.0. For some of you we’ll be also glad to announce that we have such a helper! :) Below you’ll find some information about it and why you may need this tool.

If you are using DHTMLX Scheduler with PHP back-end and have a lot of work with events (especially with recurring ones) on your back-end, you could try to use Scheduler Helper.
You can get Scheduler Helper PHP here.
Scheduler Helper provides you a basic CRUD API for managing recurring events on the server side. Helper uses PDO for database connections, so you could use any database if you have corresponding driver.
The current update was directed to solve the known issues with getting recurring events. Moreover, it contains some performance improvements.
The post Scheduler Helper for PHP Updated to Version 1.1.0 appeared first on DHTMLX Blog.
↧
↧
Integrating Gantt with Node.js using REST API and MySQL
In this tutorial we’ll show how js Gantt chart can be added into Node.js app. Unlike our previous tutorial, this time we’ll connect Gantt to the REST API for performing CRUD operations on the backend. As a result, you’ll see that this approach will provide a much cleaner and simpler code compared to what we did before.

As a data storage we’ll use MySQL, the same as we did last time. Let’s begin.
A ready sample of the described integration is available on GitHub. You can check it here. To learn how it works, continue reading the tutorial.
Initializing the project
1. Create a project folder, for this tutorial we’ll name it “gantt-node-mysql”. Then we’ll add the required dependencies and create the main executable which we’ll call “server.js”.
Dependencies are pretty basic: we’ll need express and body-parser modules, MySQL adapter for the database access and a small module named “date-format-lite” which we’ll use to convert dates of Gantt entries into the format compatible with the client-side Gantt API.
Create a project folder:
mkdir gantt-node-mysql
cd gantt-node-mysql
cd gantt-node-mysql
Then create a package.json file, we’ll use it to specify dependencies:
npm init -y
It should walk you through the process of creating a package file.
When it is done, you’ll need to open package.json and add the required dependencies into it. As a result, you should get something like this:
{
"name": "gantt-node-mysql",
"version": "1.0.0",
"description": "",
"main": "server.js",
"dependencies": {
"body-parser": "^1.15.0",
"date-format-lite": "^0.7.4",
"express": "^4.13.4",
"mysql": "^2.10.2"
},
"devDependencies": {},
"scripts": {
"test": "echo \"Error: no test specified\" && exit 1",
"start": "node server.js"
},
"keywords": [],
"author": "",
"license": "MIT"
}
Install project dependencies with the following command:
npm install
And create an empty code file named “server.js”, we’ll return to it later.
2. Create a folder named “public”. Here we’ll put dhtmlxGantt codebase and the main page of our app. Name it “index.html”, the content may look as follows:
<!DOCTYPE html>
<head>
<meta http-equiv="Content-type" content="text/html; charset=utf-8">
</head>
<script src="./codebase/sources/dhtmlxgantt.js" type="text/javascript" charset="utf-8"></script>
<link rel="stylesheet" href="./codebase/dhtmlxgantt.css" type="text/css" charset="utf-8">
<style type="text/css">
html, body{ height:100%; padding:0px; margin:0px; overflow: hidden;}
</style>
<body>
<div id="gantt_here" style='width:100%; height:100%;'></div>
<script type="text/javascript">
gantt.config.xml_date = "%Y-%m-%d %H:%i:%s";
gantt.init("gantt_here");
gantt.load("/data");
var dp = new gantt.dataProcessor("/data");
dp.init(gantt);
dp.setTransactionMode("REST");
</script>
</body>
Here we create a simple page layout, add the required js and css files from gantt codebase and add the code that initializes a gantt with a dataProcessor. We’ve specified “/data” url as a datasource and the entry point for dataProcessor requests, we’ll explain it a bit later. Note that data processor is initialized in the REST mode (you can find more info on it here).
At this step you’ll have the following folder structure:

3. The next step is to prepare a database. We create tables as shown here.
4. Then open server.js and add the following code into it:
var express = require('express');
var bodyParser = require('body-parser');
var path = require('path');
require("date-format-lite");
var port = 1337;
var app = express();
var mysql = require('mysql');
var db = mysql.createConnection({
host : 'localhost',
user : 'sampleUser',
password : 'samplePassword',
database : 'sampleGanttBase'
});
app.use(express.static(path.join(__dirname, "public")));
app.use(bodyParser.urlencoded({ extended: true }));
app.listen(port, function(){
console.log("Server is running on port "+port+"...");
});
So, here we’ve opened MySql connection to our database (we’ll need it later, for now just make sure you’ve specified actual connection parameters), specified the “public” folder as the root dir for an app and attached the app to 1337 port of the localhost.
We’ll implement actual database loading and saving later, but now we can run the app and make sure everything goes as expected so far. Go to the project folder and run the following line from the command line:
node server.js
Now open http://127.0.0.1:1337 in a browser. You should see a page with an empty gantt like the one shown here:

Loading tasks into the chart
For starters, let’s add some test data into the gantt_tasks table. You can use the following sql:
INSERT INTO `gantt_tasks` VALUES ('1', 'Project #1', '2013-04-01 00:00:00', '5', '0.8', '20', '0');
INSERT INTO `gantt_tasks` VALUES ('2', 'Task #1', '2013-04-06 00:00:00', '4', '0.5', '10', '1');
INSERT INTO `gantt_tasks` VALUES ('3', 'Task #2', '2013-04-05 00:00:00', '6', '0.7', '20', '1');
INSERT INTO `gantt_tasks` VALUES ('4', 'Task #3', '2013-04-07 00:00:00', '2', '0', '30', '1');
INSERT INTO `gantt_tasks` VALUES ('5', 'Task #1.1', '2013-04-05 00:00:00', '5', '0.34', '10', '2');
INSERT INTO `gantt_tasks` VALUES ('6', 'Task #1.2', '2013-04-11 13:22:17', '4', '0.491477', '20', '2');
INSERT INTO `gantt_tasks` VALUES ('7', 'Task #2.1', '2013-04-07 00:00:00', '5', '0.2', '10', '3');
INSERT INTO `gantt_tasks` VALUES ('8', 'Task #2.2', '2013-04-06 00:00:00', '4', '0.9', '20', '3');
Now, let’s enable data loading. As you might remember, when we initialized gantt in index.html we added the following line:
gantt.load("/data");
It will send an ajax request to the specified url, expecting to get a JSON response with gantt data (here are the format details).
And now we’ll add a server route for this url which will generate an appropriate response.
Open server.js and add the following code:
app.get("/data", function(req, res){
db.query("SELECT * FROM gantt_tasks", function(err, rows){
if (err) console.log(err);
db.query("SELECT * FROM gantt_links", function(err, links){
if (err) console.log(err);
for (var i = 0; i < rows.length; i++){
rows[i].start_date = rows[i].start_date.format("YYYY-MM-DD");
rows[i].open = true;
}
res.send({ data:rows, collections: { links : links } });
});
});
});
In the above code we read task and links from db tables (note that links table is empty at this step, since we haven’t added any data), format dates so the client side could parse them and specify the “open” property to ensure that tasks tree will be initially expanded.
After that we’ll send the collected data to http response.
If we run the application now and open http://127.0.0.1:1337 we should see that the test data we’ve previously added to the database is loaded into gantt:

Saving changes
The following code from index.html is responsible for sending updates that happen on the client side back to the server:
var dp = new gantt.dataProcessor("/data");
dp.init(gantt);
dp.setTransactionMode("REST");
dp.init(gantt);
dp.setTransactionMode("REST");
Each time the user adds, modifies or deletes something from the chart, dataprocessor will send an ajax request containing all the data required to save changes into the database.
We’ve initialized it in the REST mode, which means it will use different HTTP verbs for each type of operation, you can find route schema here
Now we’ll add the required routes and handlers that will put the changes into the database. Open server.js and add the following code:
app.post("/data/task", function(req, res){
var task = getTask(req.body);
db.query("INSERT INTO gantt_tasks(text, start_date, duration, progress, parent) VALUES (?,?,?,?,?)",
[task.text, task.start_date, task.duration, task.progress, task.parent],
function(err, result){
sendResponse(res, "inserted", result ?result.insertId:null, err);
});
});
app.put("/data/task/:id", function(req, res){
var sid = req.params.id,
task = getTask(req.body);
db.query("UPDATE gantt_tasks SET text = ?, start_date = ?, duration = ?, progress = ?, parent = ? WHERE id = ?",
[task.text, task.start_date, task.duration, task.progress, task.parent, sid],
function(err, result){
sendResponse(res, "updated", null, err);
});
});
app.delete("/data/task/:id", function(req, res){
var sid = req.params.id;
db.query("DELETE FROM gantt_tasks WHERE id = ?", [sid],
function(err, result){
sendResponse(res, "deleted", null, err);
});
});
app.post("/data/link", function(req, res){
var link = getLink(req.body);
db.query("INSERT INTO gantt_links(source, target, type) VALUES (?,?,?)",
[link.source, link.target, link.type],
function(err, result){
sendResponse(res, "inserted", result ?result.insertId:null, err);
});
});
app.put("/data/link/:id", function(req, res){
var sid = req.params.id,
link = getLink(req.body);
db.query("UPDATE gantt_links SET source = ?, target = ?, type = ? WHERE id = ?",
[link.source, link.target, link.type, sid],
function(err, result){
sendResponse(res, "updated", null, err);
});
});
app.delete("/data/link/:id", function(req,res){
var sid = req.params.id;
db.query("DELETE FROM gantt_links WHERE id = ?", [sid],
function(err, result){
sendResponse(res, "deleted", null, err);
});
});
function getTask(data){
return {
text: data.text,
start_date: data.start_date.date("YYYY-MM-DD"),
duration: data.duration,
progress: data.progress || 0,
parent: data.parent
};
}
function getLink(data){
return {
source: data.source,
target: data.target,
type: data.type
};
}
function sendResponse(res, action, tid, error){
if(error) {
console.log(error);
action = "error";
}
var result = {
action: action
};
if(tid !== undefined && tid !== null)
result.tid = tid;
res.send(result);
}
Since gantt operates with two kinds of entities – tasks and links – we need two sets of routes, one for each entity. Requests that contain operations performed with tasks will come to the “/data/task” url, and the ones related to links will go to “/data/link”.
POST request means that a new item needs to be inserted into db, PUT updates an existing record and DELETE goes for deleting.
All actions return a json response containing the type of the performed operation or “error” if something went wrong. Note that a response for the insert action also contains a database id of the new record. It will be applied on the client side, so the new item could be mapped to the database entity.
If we run the application now and open http://127.0.0.1:1337, we should have a fully operational gantt chart:
We hope this tutorial was useful for you. Please find a demo on GitHub and feel free to leave your comments.
The post Integrating Gantt with Node.js using REST API and MySQL appeared first on DHTMLX Blog.
↧
JavaScript Data Grid with Laravel 5 Usage Guide
PHP is probably one of the most popular programming languages. Especially if we talk about the web development. Following the intention to complexity reduction, dozens of PHP frameworks have been created. One of the most popular among them is Laravel. You can check this framework popularity survey made by sitepoint to make sure that Laravel at least deserves your attention.

Spoiler! That’s how dhtmlxGrid will look like in the version 5.0 ;)
This article’s aim is to describe the basics of Laravel usage. This framework was created for the development of web applications following the model–view–controller (MVC) architectural pattern. One of the core features of Laravel is a modular packaging system that allows adding new components to your project. Since we’re not interesting in the creation of a simple “Hello, World!” application, we’ll use this feature to create something that looks like an actual web app. We’ll use our dhtmlxGrid component for our task. It’s a JavaScript grid control that you can use for creating Ajax-enabled tables with rich in-cell editing, built-in filtering, searching, and grouping capabilities.
dhtmlxGrid doesn’t require a big amount of code for using it, and one article will be enough to create a working example.
Step 1. Using Composer to Install Laravel
Composer is a package manager for PHP that we can use to create a new Laravel project and install the required dhtmlxGrid files. If you use a Linux distribution, Composer is possibly available through a repository, and you can install it using your package manager like you install any other package. Otherwise, you can follow this installation guide.
There’s a well-written guide that describes in detail how you can install Laravel, create and configure a new project. We’ll use previously installed Composer.
Run in your terminal:
composer create-project laravel/laravel --prefer-dist dhtmlxGrid
This command will create a new Laravel project in a directory named dhtmlxGrid. If you want, you can check if everything works well. Open the newly created directory and run the server:
cd dhtmlxGrid
php artisan serve
php artisan serve
Now you can open http://localhost:8000/ in your browser. Here’s what you should get:

Everything works which means that we can return to our application. Now we need to install dhtmlxConnector which enables access to external data sources. We need it for saving and loading the data. The best thing about using Laravel is the possibility to add this component to a project via composer using a single command.
You can use the Packagist website if you want to find a proper package. You can find comprehensive information about the component that you want to use. Composer installation command, requirements, short description, link to the documentation page, etc.:

In our case, to install dhtmlxConnector you should use the following command:
composer require dhtmlx/connector-php
Step 2. Get the dhtmlxGrid Package
After the installation complete, we should download the package with dhtmlxGrid. Within the public folder of your project create a new directory named dhtmlxGrid and unpack the content of the package into it.
Step 3. Create the Database
You can download the pre-created zip archive that contains the database dump file we can use. Unpack the archive and you’ll see the dhtmlx_samples.sql file.
Now, we can create a new database. If you use MySQL run:
mysql -u root -p
After you insert the password, you can create a new database and import the data from the dump file into it:
CREATE DATABASE grid;
USE grid;
\. /path/to/file/dhtmlx_samples.sql
USE grid;
\. /path/to/file/dhtmlx_samples.sql
After you finish with this task, we can finally create the application.
Step 4. Create a Model
We need to specify the appropriate model class to get the access to the data. Create a new file named Grid.php within the app directory of your project:
<?php
namespace App;
use Illuminate\Database\Eloquent\Model;
class Grid extends Model
{
protected $table = "scheduler_events";
public $primaryKey = "event_id";
public $timestamps = false;
}
namespace App;
use Illuminate\Database\Eloquent\Model;
class Grid extends Model
{
protected $table = "scheduler_events";
public $primaryKey = "event_id";
public $timestamps = false;
}
That’s it. Now we can create the View Object.
Step 5. Create the View Object
Within the resources/views directory, create a new file named grid.php:
<!DOCTYPE html>
<head>
<script src="dhtmlxGrid/codebase/dhtmlxgrid.js"></script>
<link rel="stylesheet" href="dhtmlxGrid/codebase/dhtmlxgrid.css">
</head>
<body>
<div id="grid_here" style="width: 600px; height: 400px;"></div>
<script type="text/javascript" charset="utf-8">
mygrid = new dhtmlXGridObject('grid_here');
mygrid.setHeader("Start date,End date,Text");
mygrid.init();
mygrid.load("./grid_data");
var dp = new dataProcessor("./grid_data");
dp.init(mygrid);
</script>
</body>
Step 6. Create the Controller
The controller that we want to create will do two things: load the view, and load and process the data.
To load and process data we will use GridConnector:
$connector = new GridConnector(null, "PHPLaravel");
$connector->configure(new Grid(),"event_id","start_date,end_date,event_name");
$connector->render();
$connector->configure(new Grid(),"event_id","start_date,end_date,event_name");
$connector->render();
The GridConnector constructor takes 2 parameters:
- null – null is passed, as a model, not a database is used;
- $PHPLaravel – the module for working with PHP, the hardcoded value;
The configure method configures the GridConnector object without rendering data and takes 5 parameters:
- new $modelName – the method creating a model. In this case, new Grid() that we have defined earlier;
- $id – the name of the id field;
- $text – a comma separated list of rendered data fields;
- $extra – (optional) a comma separated list of extra fields;
- $relation_id – (optional) used for building hierarchy in case of Tree and TreeGrid;
Now, within the app/Http/Controllers folder create a new file, GridController.php:
<?php
namespace App\Http\Controllers;
use App\Grid;
use Dhtmlx\Connector\GridConnector;
class GridController extends Controller
{
public function data() {
$connector = new GridConnector(null, "PHPLaravel");
$connector->configure(
new Grid(),
"event_id",
"start_date, end_date, event_name"
);
$connector->render();
}
}
Step 7. Final Configuration
We should edit the .env file that you can find within the root file of your project. We need to change four lines to give Laravel access to the previously created database:
DB_HOST=localhost
DB_DATABASE=grid
DB_USERNAME=root
DB_PASSWORD=yourpassword
DB_DATABASE=grid
DB_USERNAME=root
DB_PASSWORD=yourpassword
Now, let’s deal with routes. If you open the app/Http/routes.php file you’ll find the default route configuration that may look like this:
Route::get('/', function () {
return view('welcome');
});
return view('welcome');
});
This code will perform the GET request after you open your project in a browser. As a result, the welcome view from the resources/views folder will be returned. We should replace it with the previously created view, grid.php. The other step is to use GridController to save and load data. All you need to do is to replace the existing route with the following:
Route::get('/', function () {
return view('grid');
});
Route::match(['get', 'post'], '/grid_data', "GridController@data");
return view('grid');
});
Route::match(['get', 'post'], '/grid_data', "GridController@data");
One more step left. Laravel protects your application from cross-site request forgeries by generating a CSRF “token” for each active user session managed by the application. You can read more about the mechanisms of protection on this page if you want, but what we need to do now is to exclude one particular URI from CSRF protection. The one that triggered when created data is supposed to be saved. We need to add a proper value to the $except property in the file app/Http/Middleware/VerifyCsrfToken.php:
protected $except = [
'grid_data'
];
'grid_data'
];
Step 8. Run the Application
Open your project’s directory and run in terminal:
php artisan serve
Open http://localhost:8000/ in your browser and you’ll see the working dhtmlxGrid:

Here’s the table that contains the data from our database.
That’s all. We hope you have enjoyed the tutorial.
The post JavaScript Data Grid with Laravel 5 Usage Guide appeared first on DHTMLX Blog.
↧
Using Scheduler with Scalatra Framework and MongoDB
Today we’ll show you the way of using JavaScript Event Calendar with Scalatra Web Framework. Scalatra is a free and open source web application framework written in Scala. To install it, please follow the instructions you could find here. When installation is completed, we can start.
The demo is available on GitHub, so you’re welcome to check it right now.
Step 1: Create a new scalatra app
Open a folder where you want to create a new project and run the following command:
g8 scalatra/scalatra-sbt
There will be some questions about the application, so you need to fill them out and then you may continue. As a result, we should get something like this:
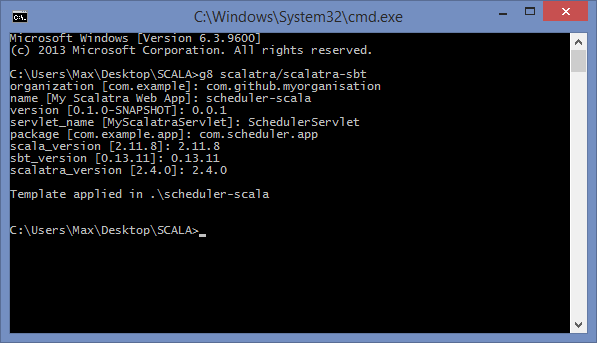
Now, let’s go to the app directory and make sure that it works.
cd scheduler-scala
sbt
jetty:start
sbt
jetty:start
To open the page, call “browse” command in the console or open http://127.0.0.1:8080 in a browser. We should get the Hello World app to proceed to the next steps.
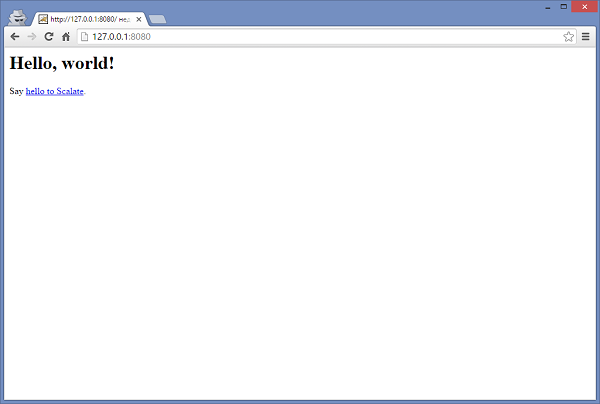
Got it? Great! Let’s move on.
We can’t proceed without Scheduler, so it’s high time to download it. Now we can open scheduler-scala\src\main\webapp, create dhtmlxScheduler folder and unpack the scheduler codebase content to it:
Then open scheduler-scala\src\main\webapp\WEB-INF\templates\views and create index.jade file with the following content:
- attributes("title") = "Scheduler Sample"
script(type='text/javascript' src='/dhtmlxScheduler/dhtmlxscheduler.js')
link(rel='stylesheet' href='/dhtmlxScheduler/dhtmlxscheduler.css')
#scheduler_here.dhx_cal_container(style='width: 100%; height: 700px')
.dhx_cal_navline
.dhx_cal_prev_button
.dhx_cal_next_button
.dhx_cal_today_button
.dhx_cal_date
.dhx_cal_tab(name='day_tab')
.dhx_cal_tab(name='week_tab')
.dhx_cal_tab(name='month_tab')
.dhx_cal_header
.dhx_cal_data
script
|scheduler.config.xml_date="%Y-%m-%d %H:%i:%s";
|scheduler.init("scheduler_here",new Date(2016,3,18));
|scheduler.load("/data", "json");
|var dp = new dataProcessor("/data/");
|dp.init(scheduler);
|dp.setTransactionMode("REST");
That’s how we’re creating a simple page layout for scheduler and adding required scripts and styles from scheduler codebase. We also need to initialize “/data” url as a datasource for the calendar. We’ll add the handlers to the server side later.
Now open scheduler-scala\src\main\scala\com\scheduler\app\SchedulerServlet.scala and replace this part:
get("/") {
<html>
<body>
<h1>Hello, world!</h1>
Say <a href="hello-scalate">hello to Scalate</a>.
</body>
</html>
}
<html>
<body>
<h1>Hello, world!</h1>
Say <a href="hello-scalate">hello to Scalate</a>.
</body>
</html>
}
By this one:
get("/") {
contentType = "text/html"
jade("/index")
}
contentType = "text/html"
jade("/index")
}
As you can see, we start using index.jade as the main app page. If everything is done correctly in the previous steps, we should see an empty scheduler when we start the app:
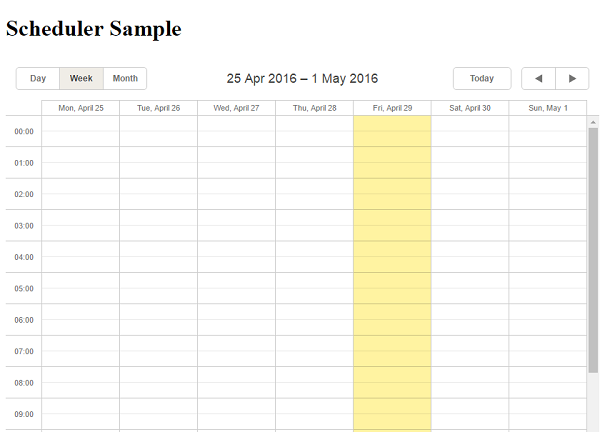
All the fundamental preparations are done, so we can move to the next step and load our scheduler app with data.
Step 2: Data loading
First of all, we need to add route handlers for data loading. For this, open scheduler-scala\project\build.scala and add the following dependency to libraryDependencies:
"org.mongodb" %% "casbah" % "2.7.2"
As a result, we get the following:
libraryDependencies ++= Seq(
"org.mongodb" %% "casbah" % "2.7.2",
"org.scalatra" %% "scalatra" % ScalatraVersion,
"org.scalatra" %% "scalatra-scalate" % ScalatraVersion,
"org.scalatra" %% "scalatra-specs2" % ScalatraVersion % "test",
"ch.qos.logback" % "logback-classic" % "1.1.5" % "runtime",
"org.eclipse.jetty" % "jetty-webapp" % "9.2.15.v20160210" % "container",
"javax.servlet" % "javax.servlet-api" % "3.1.0" % "provided"
),
Open scheduler-scala\src\main\scala\ScalatraBootstrap.scala and put following code:
import com.mongodb.casbah.Imports._
import com.scheduler.app._
import org.scalatra._
import javax.servlet.ServletContext
import com.mongodb.casbah.commons.conversions.scala.{RegisterConversionHelpers, RegisterJodaTimeConversionHelpers}
class ScalatraBootstrap extends LifeCycle {
override def init(context: ServletContext) {
RegisterConversionHelpers()
RegisterJodaTimeConversionHelpers()
val mongoClient = MongoClient()
val mongoColl = mongoClient("scheduler")("events")
context.mount(new SchedulerServlet(mongoColl), "/*")
}
}
Here we have created connection to MongoDB, got the link to MongoDB collection and passed it to our controller (with the mongoColl variable).
Since we’ve passed a collection into the controller, we need to modify its signature and add the necessary parameter into it. So open scheduler-scala\src\main\scala\com\scheduler\app\SchedulerServlet.scala and put following code:
package com.scheduler.app
import java.text.SimpleDateFormat
import java.util.Date
import com.mongodb.casbah.Imports._
import org.joda.time.DateTime
import org.joda.time.format.DateTimeFormat
class SchedulerServlet(mongoColl: MongoCollection) extends SchedulerscalaStack {
var dateFormat = DateTimeFormat.forPattern("yyyy-MM-dd HH:mm:ss")
def getEvent(params: Map[String, String]): MongoDBObject = {
MongoDBObject(
"text" -> params("text"),
"start_date" -> dateFormat.parseDateTime(params("start_date")),
"end_date" -> dateFormat.parseDateTime(params("end_date"))
)
}
get("/") {
contentType = "text/html"
jade("/index")
}
get("/init") {
mongoColl += getEvent(Map("text" -> "My Test Event A", "start_date" -> "2016-04-18 03:00:00", "end_date" -> "2016-04-18 11:00:00"))
mongoColl += getEvent(Map("text" -> "My Test Event B", "start_date" -> "2016-04-20 07:00:00", "end_date" -> "2016-04-20 12:00:00"))
mongoColl += getEvent(Map("text" -> "Friday Event", "start_date" -> "2016-04-22 06:00:00", "end_date" -> "2016-04-22 15:00:00"))
}
get("/data") {
val evs = for{
x <- mongoColl
} yield MongoDBObject("id" -> x.get("_id").toString(),
"text" -> x("text"),
"start_date" -> x.as[DateTime]("start_date").toString(dateFormat),
"end_date" -> x.as[DateTime]("end_date").toString(dateFormat))
contentType = "application/json"
"[%s]".format(evs.mkString(","))
}
}
In the above code we’ve added the MongoCollection parameter for controller – SchedulerServlet(mongoColl: MongoCollection) and created the “/init” and “/data” handlers.
The “/init” handler is made just to generate some test data for the collection.
The “/data” handler is intended for loading data into scheduler. It gets all the records from database and sends them to the client side in the JSON format.
As you may remember, we have the following string in our index.jade:
scheduler.load("/data", "json");
It sends a request to the server to load data to the scheduler in JSON format.
Now we can restart our server and open http://127.0.0.1:8080/init. After this initial data for scheduler should be generated. Then we just need to open http://127.0.0.1:8080/ and scheduler with initial events will appear.
Step 3: Adding, editing and deleting data
We have a scheduler with events, but it doesn’t possess any useful features yet. Let’s provide it with such necessary abilities as adding, deleting and editing data.
Open scheduler-scala\src\main\scala\com\scheduler\app\SchedulerServlet.scala and add the insert, update, and delete handlers. We will also add a function that will get responses.
The resulting code will look like this:
package com.scheduler.app
import java.text.SimpleDateFormat
import java.util.Date
import com.mongodb.casbah.Imports._
import org.joda.time.DateTime
import org.joda.time.format.DateTimeFormat
class SchedulerServlet(mongoColl: MongoCollection) extends SchedulerscalaStack {
var dateFormat = DateTimeFormat.forPattern("yyyy-MM-dd HH:mm:ss")
def getEvent(params: Map[String, String]): MongoDBObject = {
MongoDBObject(
"text" -> params("text"),
"start_date" -> dateFormat.parseDateTime(params("start_date")),
"end_date" -> dateFormat.parseDateTime(params("end_date"))
)
}
def getResponse(mode: String, tid: String): String = {
var response = Map("type" -> mode)
if(tid != null) response += ("tid" -> tid)
"{%s}".format((response map {case (k,v) => "\""+k+"\":\""+v+"\""}).mkString(","))
}
get("/") {
contentType = "text/html"
jade("/index")
}
get("/init") {
mongoColl += getEvent(Map("text" -> "My Test Event A", "start_date" -> "2016-04-18 03:00:00", "end_date" -> "2016-04-18 11:00:00"))
mongoColl += getEvent(Map("text" -> "My Test Event B", "start_date" -> "2016-04-20 07:00:00", "end_date" -> "2016-04-20 12:00:00"))
mongoColl += getEvent(Map("text" -> "Friday Event", "start_date" -> "2016-04-22 06:00:00", "end_date" -> "2016-04-22 15:00:00"))
}
get("/data") {
val evs = for{
x <- mongoColl
} yield MongoDBObject("id" -> x.get("_id").toString(),
"text" -> x("text"),
"start_date" -> x.as[DateTime]("start_date").toString(dateFormat),
"end_date" -> x.as[DateTime]("end_date").toString(dateFormat))
contentType = "application/json"
"[%s]".format(evs.mkString(","))
}
post("/data/:id"){
val newEvent:MongoDBObject = getEvent(params)
mongoColl += newEvent
contentType = "application/json"
getResponse("inserted", newEvent("_id").toString())
}
put("/data/:id") {
val query = MongoDBObject("_id" -> new ObjectId(params("id")))
val event:MongoDBObject = getEvent(params)
mongoColl.findAndModify(query, event)
contentType = "application/json"
getResponse("updated", null)
}
delete("/data/:id"){
val query = MongoDBObject("_id" -> new ObjectId(params("id")))
mongoColl.remove(query)
contentType = "application/json"
getResponse("deleted", null)
}
}
When we restart the server and open http://127.0.0.1:8080 in browser again, our calendar will be able to create, edit and delete events. What is more, now all the changes will be automatically saved in the database and won’t disappear after reloading the page.
The demo is available on GitHub, so you’re welcome to check it right now.
The post Using Scheduler with Scalatra Framework and MongoDB appeared first on DHTMLX Blog.
↧